
How To Create Shield Security Network With Automatic Import/Export Feature
Import/Export is a feature inside Shield plugin. It helps you to automatically import options and deploy configurations across your entire security network.
With Automatic Network Import/Export, a master Shield site can share selected settings with approved client sites. Each client can import once, or join the network and continue to receive the selected settings automatically.
This unique feature has the following characteristics:
- Direct Site-To-Site. You import the options directly from any remove site.
- Security First:
- Handshaking – when a site requests an export, we check back with the site to make sure that it really did request it.
- Master Site Templates– create a “master site” where you change your settings only once, and have your other WordPress sites automatically update themselves from it
- One Site To Rule Them. Rather than go round each site and manually update or import, you can all your sites poll your master site and import automatically.
- You can even have your master site notify your other sites that the options have changed and they should update asap.
How To Use Import/Export Feature
On each site, open Shield > Import/Export and select the Network Sync tab. Turn on Automatic Network Import/Export. On the master site, use Manage client sites to approve or invite client sites.
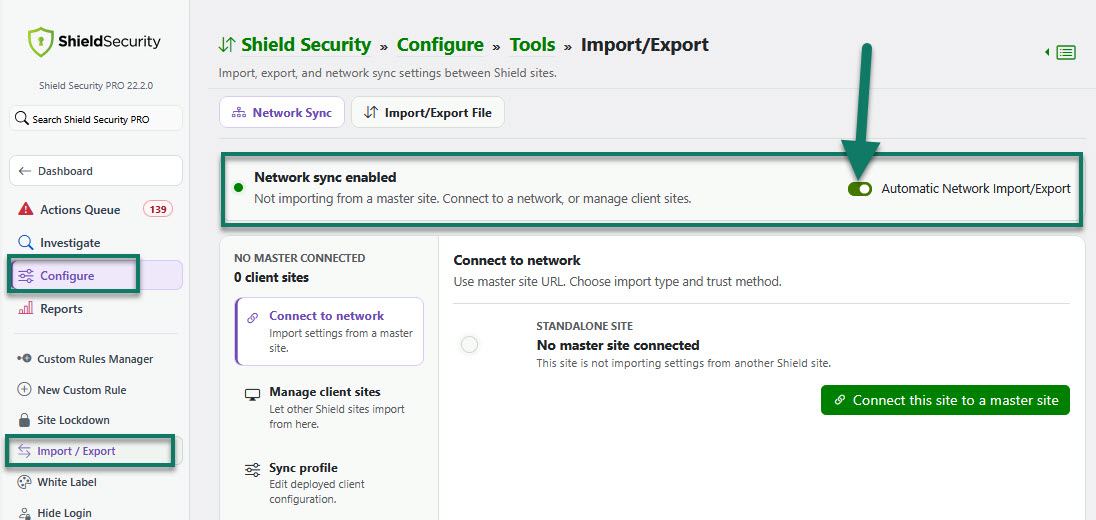
Once you've done that, you can create your own Shield Security Network
- from import/export file; or
- from site.
How To Import/Export Options From a File
To do this, you'll just need to export options from a master site and import them to your client site by following these steps:
1) Go to the master site > main sidebar menu > Configure > Import/Export File > Export settings > and click the button to download export file.
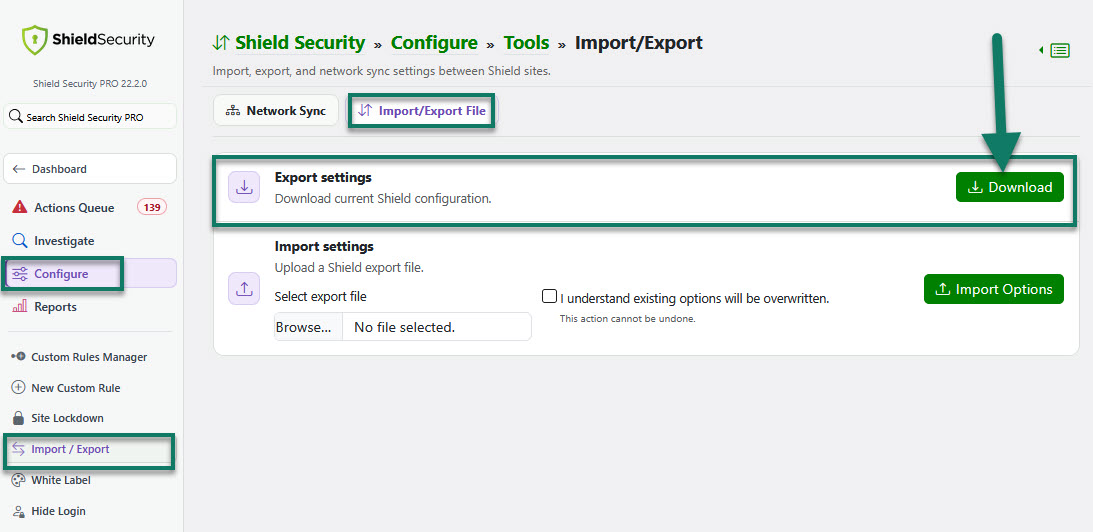
2) Go to the client site > Import settings.
Then, browse to the exported file > check the checkbox to confirm that the existing options will be overwritten > click Import Options.
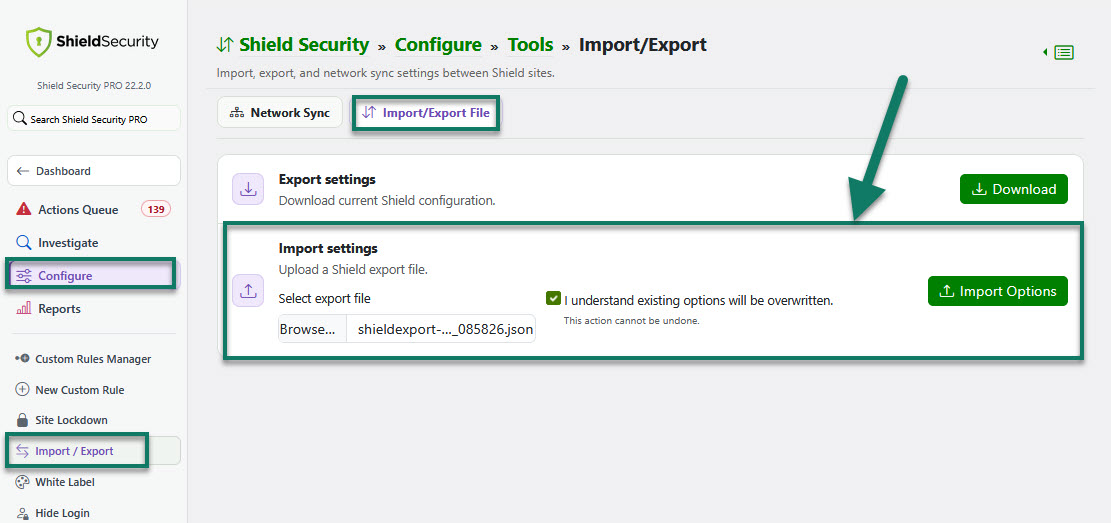
Note: Before confirming this, please be sure that this is what you intend - it can't be undone.
Hint: You can also use this option to create a backup of your ShieldPRO plugin settings.
How To Connect a Site To a Shield Network
By creating a Master site, you can update options on there, and have all your client sites pull their configuration from it. To achieve this, you need to setup your Master-Client Network by following these steps:
- On the master site, open Shield > Import/Export > Network Sync and turn on Automatic Network Import/Export.
- On the master site, select Manage client sites, add the client site's URL, and send an invite if appropriate. This approves the client to import from the master without a secret key.
- On the client site, open Shield > Import/Export > Network Sync and turn on Automatic Network Import/Export.
- Select Connect this site to a master site and enter the master site's URL.
- Choose Join network to keep automatic imports enabled. Choose Import once only when the client should not remain linked to the master.
- Under Master site verification, choose either Master site already trusts this site, or Use master site secret key and paste the current key from the master.
- Confirm that existing settings will be overwritten, then select Join network or Import settings.
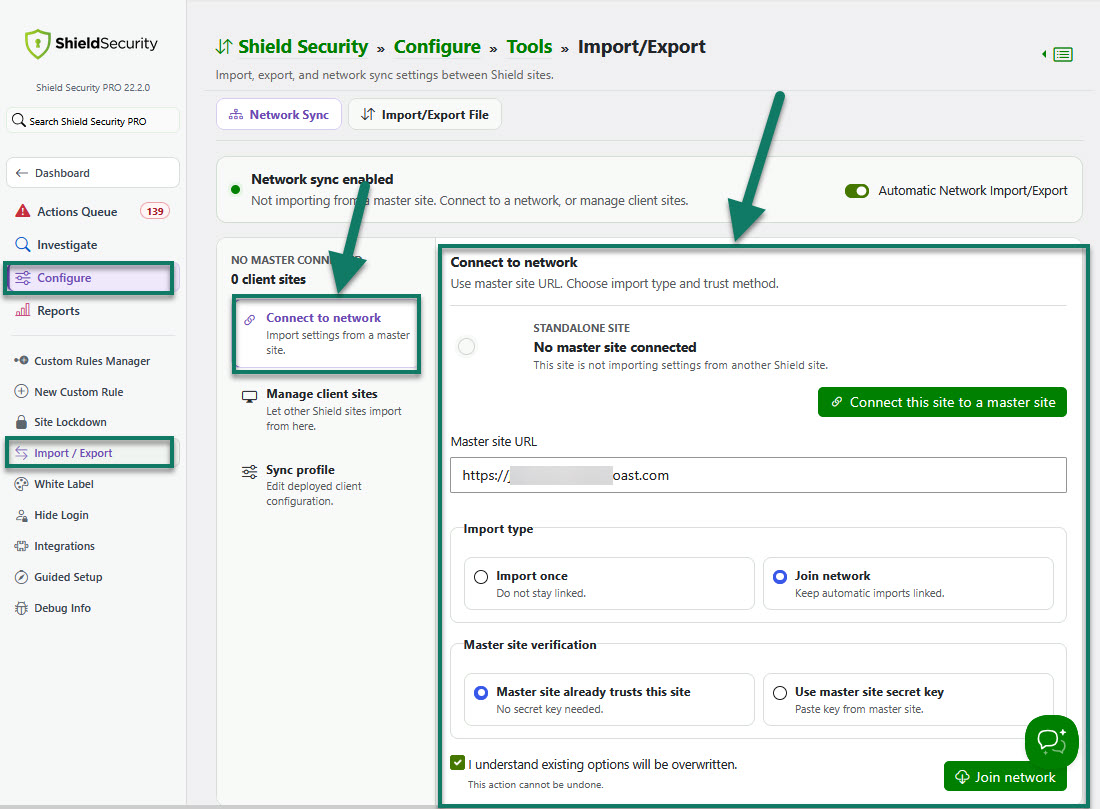
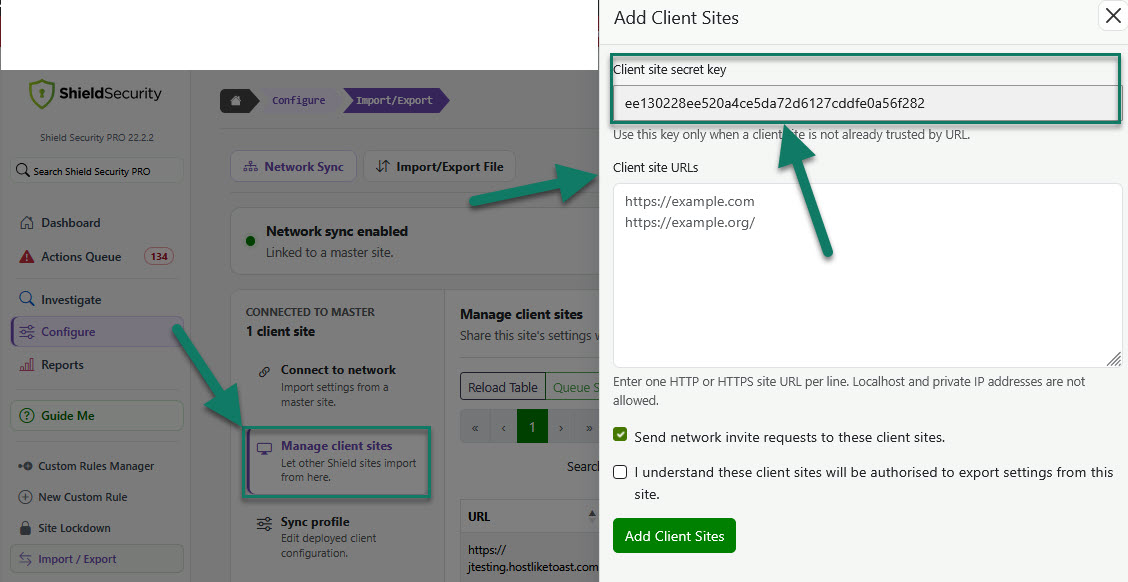
If the client site needs to verify the connection with a secret key, open the relevant client-site entry and copy the Client Site Secret Key. Then, return to the client site and paste it into the Master Site Secret Key field while connecting to the network.
This key is located under the "Manage client sites" section > click +Add Client Sites and the sidebar window will open up for you.
Important: This key is renewed every 24 hours. Keep it private, because it permits a client site to request settings from the master site.
- Confirm that you understand the existing Shield options on this site will be overwritten.
- Select Join network or the relevant import button to complete the connection.
Note: Checking this option on will link this client site to Master site. A joined client site automatically checks the master during Shield's daily sync. When settings are saved on the master, active client sites are also queued to sync sooner. When you adjust options on the Master site, the client site imports the Shield settings included in the master's sync profile. Existing values for those settings are overwritten.
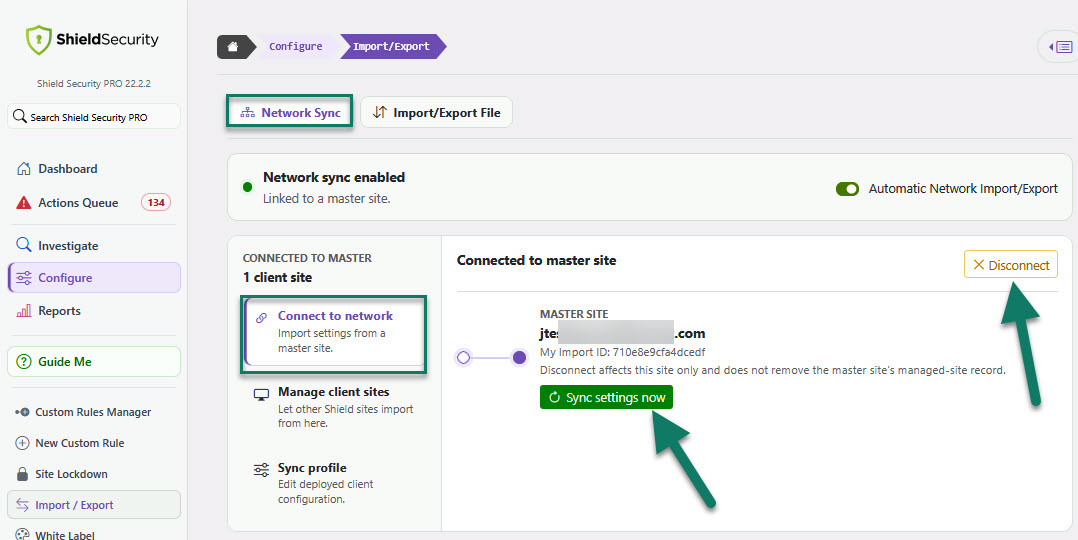
After the connection is created, the Network Sync page displays the site connected to master site. You can select Synchronise settings now to import the latest settings immediately, or select Disconnect to remove the connection, as shown in the screenshot below.
How To Authorise and/or Review Client Sites
Use Manage client sites section on the master site to add, authorise, and review client sites.
To add Client sites,
- Select Manage client sites.
- Click +Add client sites.
- Enter the Client Site URL.
- Choose whether to send a network invitation request to the client site.
- Confirm that the client site will be authorised to export settings from this master site.
- Click Add client site.
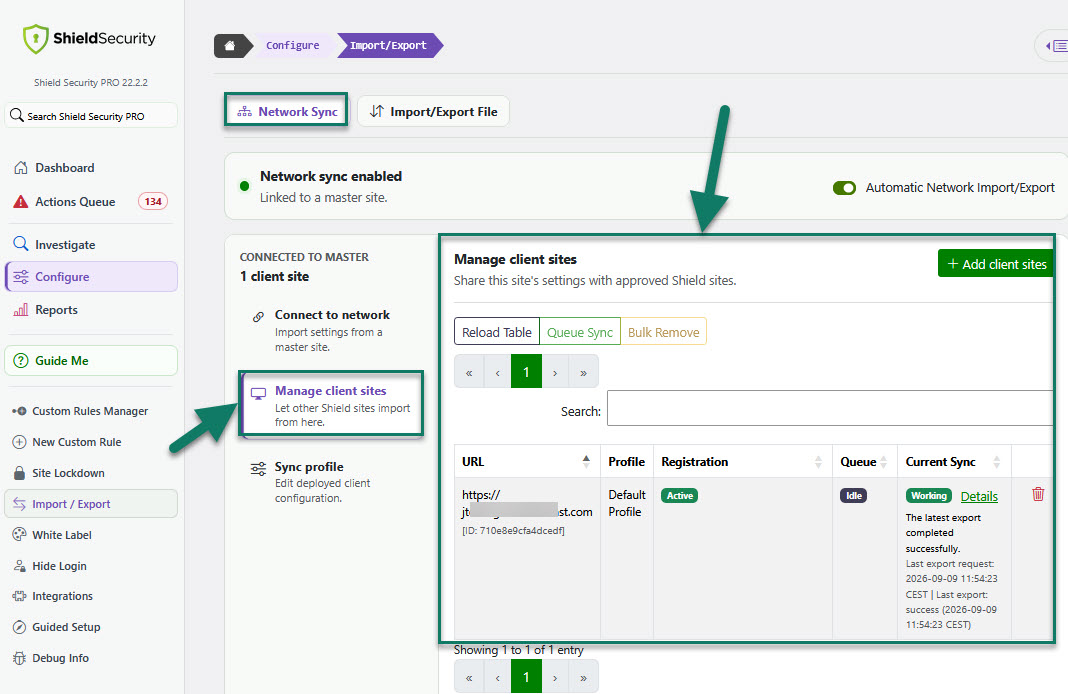
The client-site list (table) shows the connected sites and relevant synchronisation status and details. Select a client site to review its synchronisation information. (see the below screenshot for illustration)
How To Control What's Synchronised
A synchronisation profile controls which Shield settings are included when settings are imported across your network.
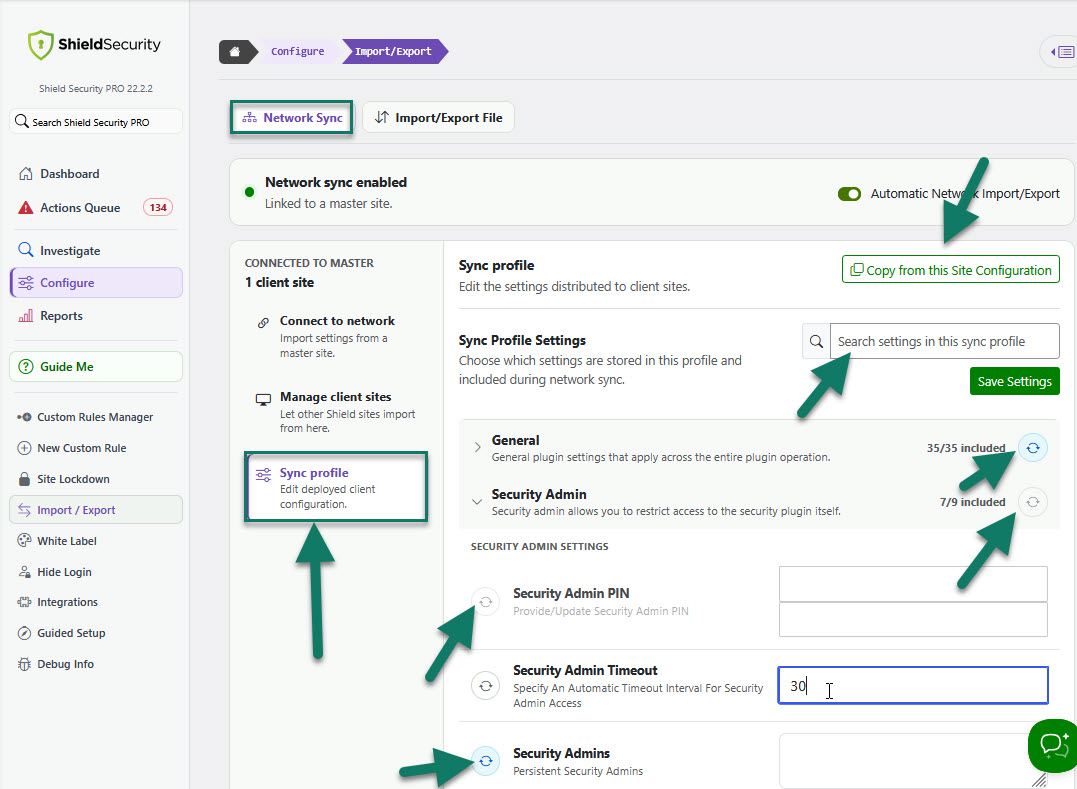
Use the master site's Sync profile to choose which Shield settings are included in network sync. The profile is available after the master has one or more connected client sites.
- Go to Configure > Import/Export > Network Sync.
- Select Sync profile.
- Review the Shield configuration groups and individual settings.
- Click Include or Exclude this group from syncs for an entire settings group.
- Expand a group to include or exclude individual settings.
You can also use the settings search field to find a specific option quickly. (see the screenshot bellow)
Please note that only settings included in the synchronisation profile are distributed to connected client sites. This lets you share the settings that should remain consistent across your network while keeping site-specific settings independent.
To learn more about Import/Export feature, read the blog article here.
Note: Automatic Network Import/Export requires an eligible Shield Pro plan. To find out what the extra ShieldPRO features are and how to purchase, please follow this link here.