Bots & IP Rules: IP Management and Investigation Tool
IP Management & Investigation is basically an essential method which you can use to analyse IP address, review information concerning the blacklisted and whitelisted IP addresses and a very useful IPs management tool.
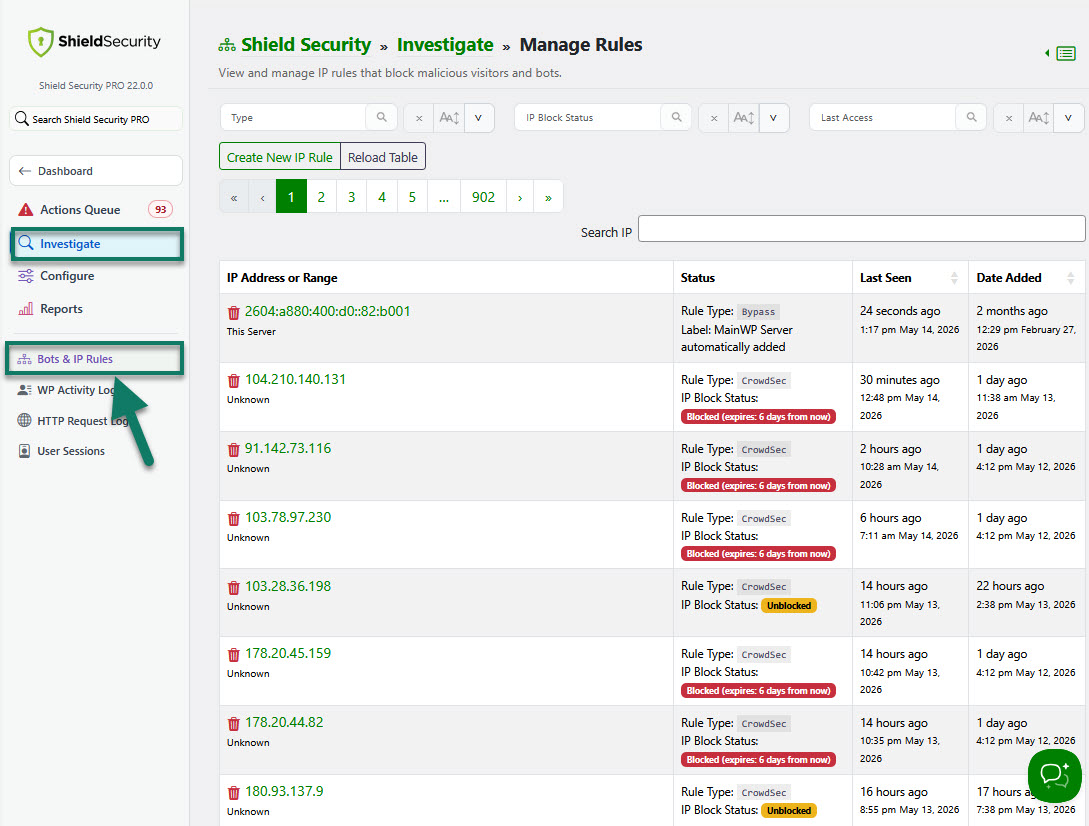
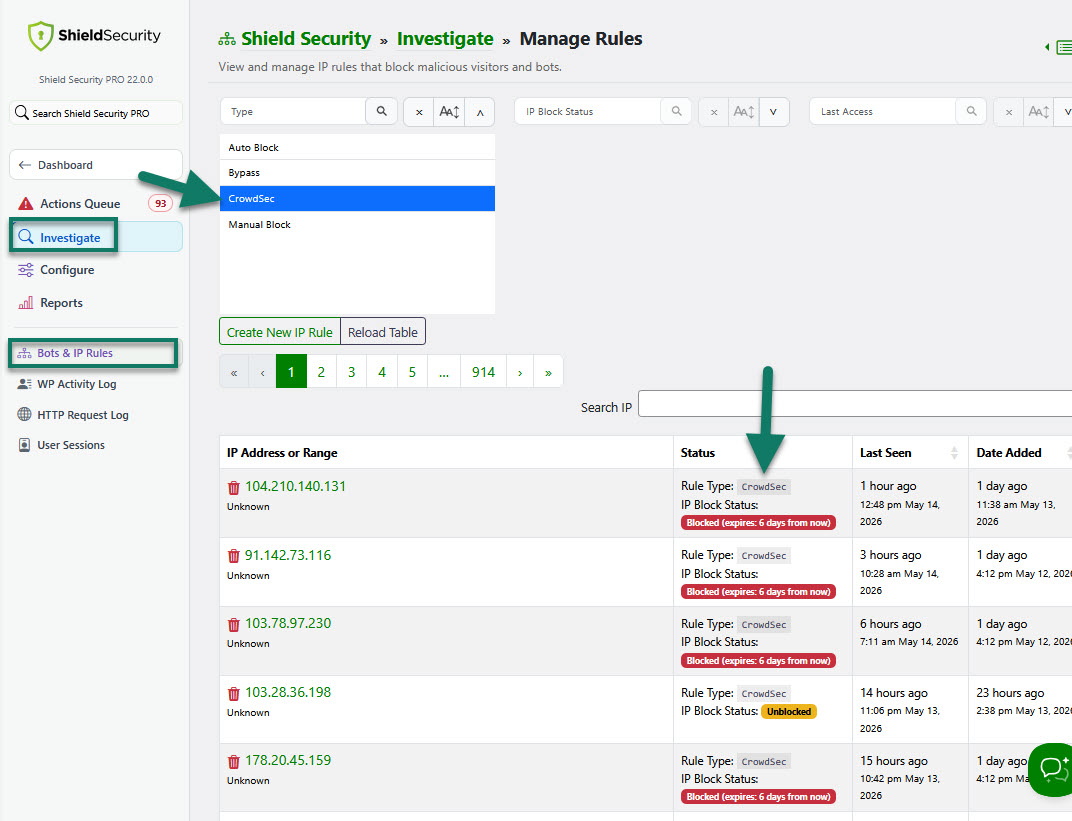
This tool is available within the main navigation menu > Investigate section > Bots & IP Rules.
How to use IP Management and Investigation tool
This fully depends on your own requirements. The options available are as follows:
- IP Investigate dialog - you can use this to see all information pertaining to an IP address in 1 place.
- Crowd-Sourced IP address blocking in partnership with CrowdSec.
- Manage IP addresses that have tripped Shield defenses - blocked (blacklisted) IPs.
- Manage IP addresses that are whitelisted, never blocked by Shield.
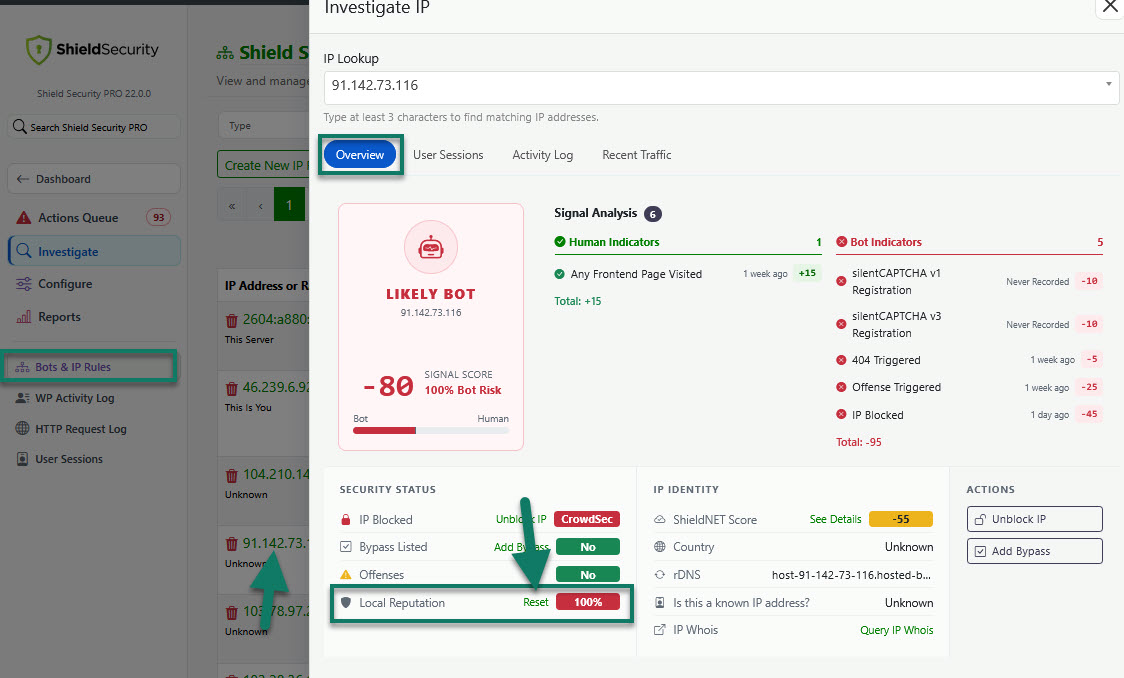
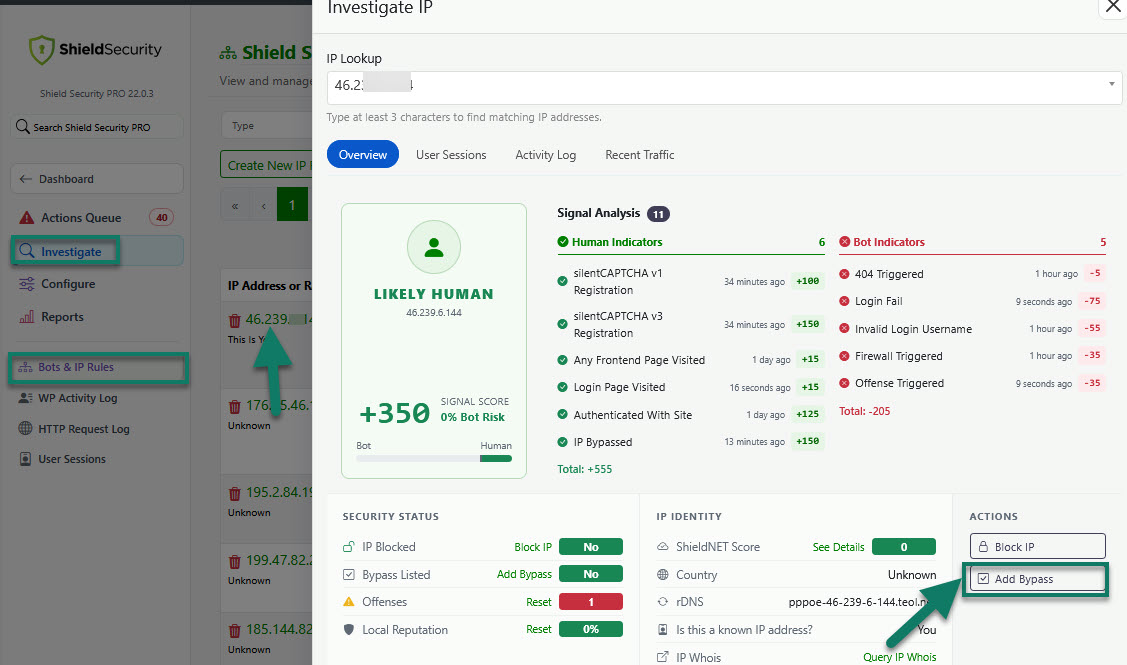
IP Investigate Dialog
The IP Investigate dialog lets you see all information pertaining to an IP address in 1 place.
You can click the IP address you want to analyse and review the all activities related to that IP.
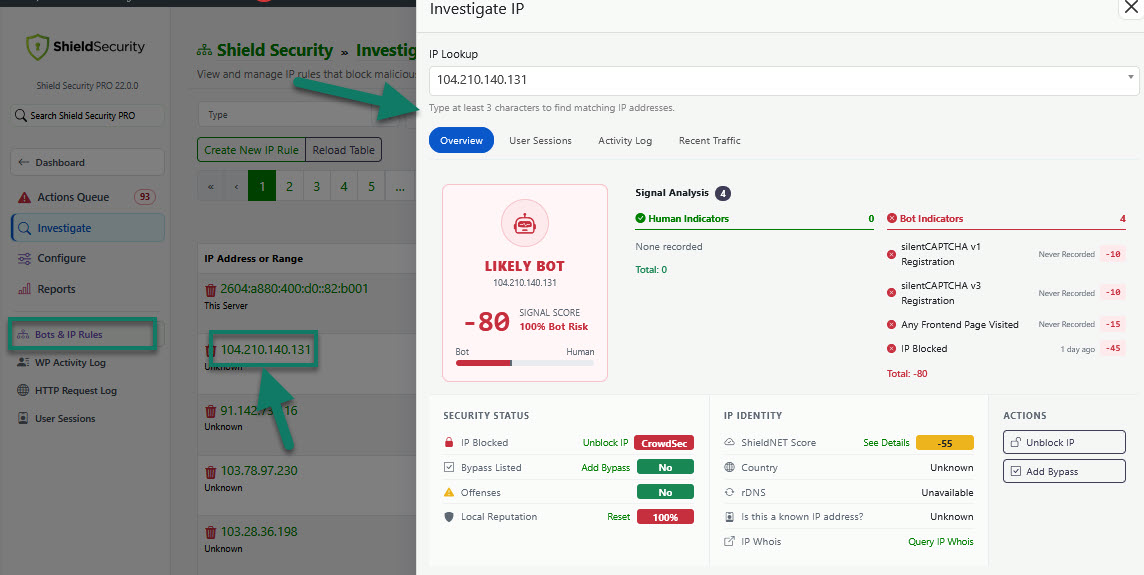
The information available are as follows:
- Overview - Bot indicator, IP status (number of offenses, if blocked or not, if whitelisted or not, IP and ShieldNET reputation score), identifying info, IP whois.
- User sessions related to this IP
- Activity log - activities related to this IP
- Recent traffic - visitor requests (time, response code, request details)
How to review/manage blocked (blacklisted) IPs
When the Automatic IP Black List System is set, and the number of offenses exceeds the specified limit, the unwanted visitors get automatically blocked from accessing the site - their IPs get blacklisted.
The data available are as follows:
- If the IP is blacklisted or not (this depends on the number of the offenses)
- Number of offenses (your site access attempts)
- Last offense time
- The IP address
- Date/Time of your site last access attempt
- Time left before the IP get automatically removed from the blacklist
- Add/Delete the IP from the blacklist
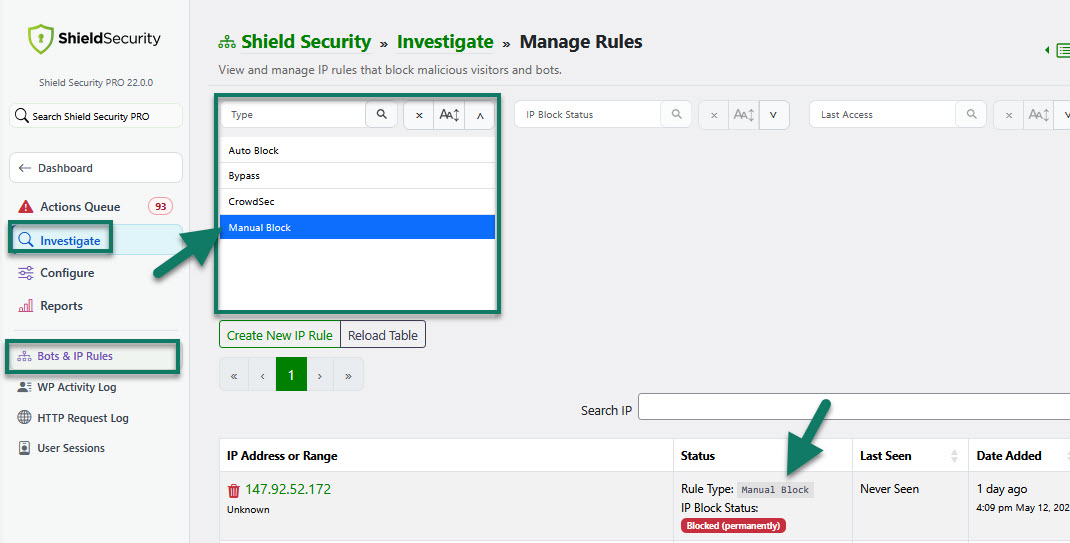
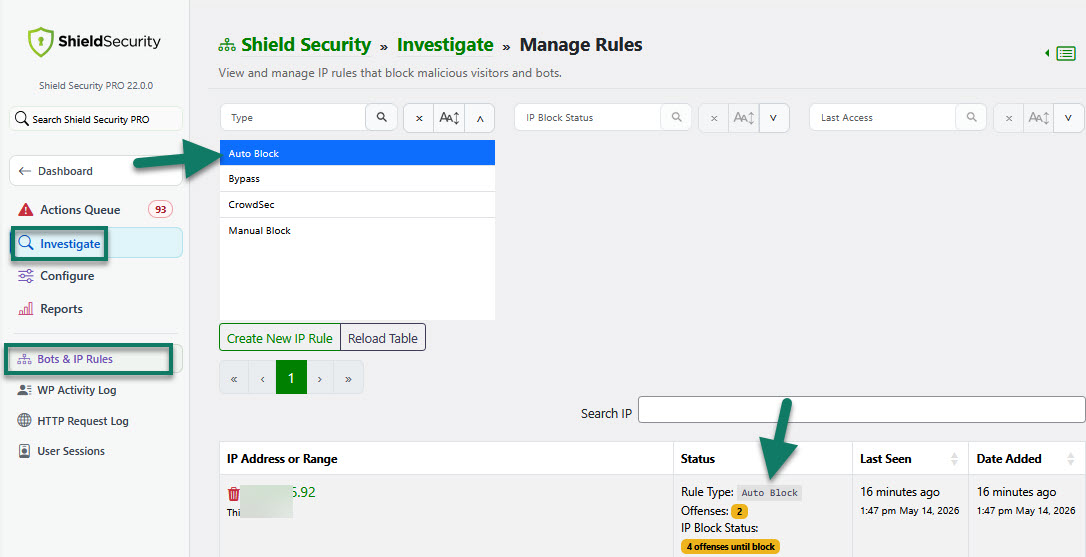
There are x3 types of blocked IPs on this list:
-
These IPs are blocked automatically by the Shield's Auto Blocking System.
Status: Temporarily blockedWill be auto-removed from this block list. When this will happen depends on your "Auto Block Expiration" configuration.These IPs can be also removed manually from the block list. -
Auto blocked IPs found on CrowdSec's list of malicious IP addresses.
Status: Temporarily blockedCrowdsec downloads the latest IP once per day for their premium, and once per week for free.IPs expire at 7 days, or if CrowdSec data says specifically when to expire them. -
Manually blocked IPs
Status: Blocked permanentlyCan be removed from the block list manually only.
You can filter and review/manage blocked IPs by type.
How to reset IP Local Reputation score
To reset an individual IP’s Local Reputation score, start by opening the IP Investigate dialog.
Find the IP in the table and click on it.
In the IP Investigate dialog > Overview > Local Reputation > choose “Reset”, which will clear all offenses and bot signals for that IP and return its score to zero.
How to remove your IP from the blocklist/blacklist
To remove your IP from the blocklist/blacklist, just click "Delete" button for your IP and you'll be unblocked instantly.

How to add IP to the blocklist/blacklist
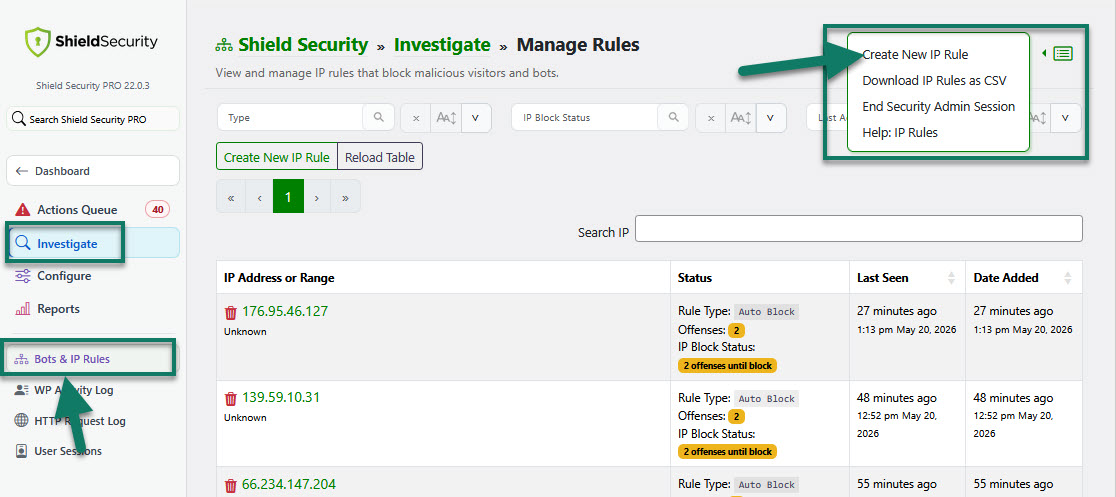
To add IP you want to block/blacklist, the easiest way is to use the "Create New IP Rule" button.
Go to Bots & IP Rules table, and you'll see a menu with the "Create New IP Rule" button. Click that button to open the sidebar form. Enter the IP address you want to add to the blocklist manually. Fill out the form and click "Create New IP Rule" to save. The IP rule is added immediately.
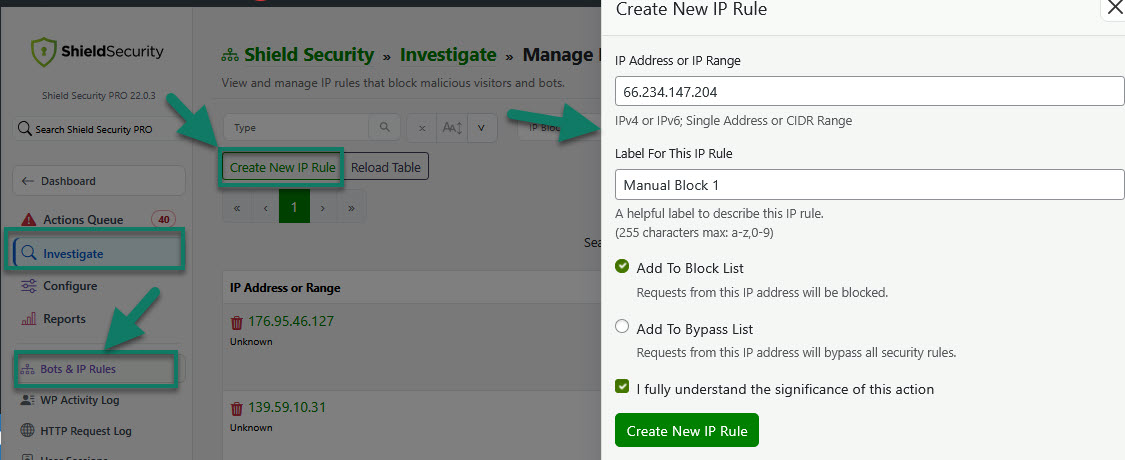
Alternatively, you can use the Additional Actions drop-down menu in the top-right corner and select the "Create New IP Rule" option, then use the same form to add the IP to the blocklist.
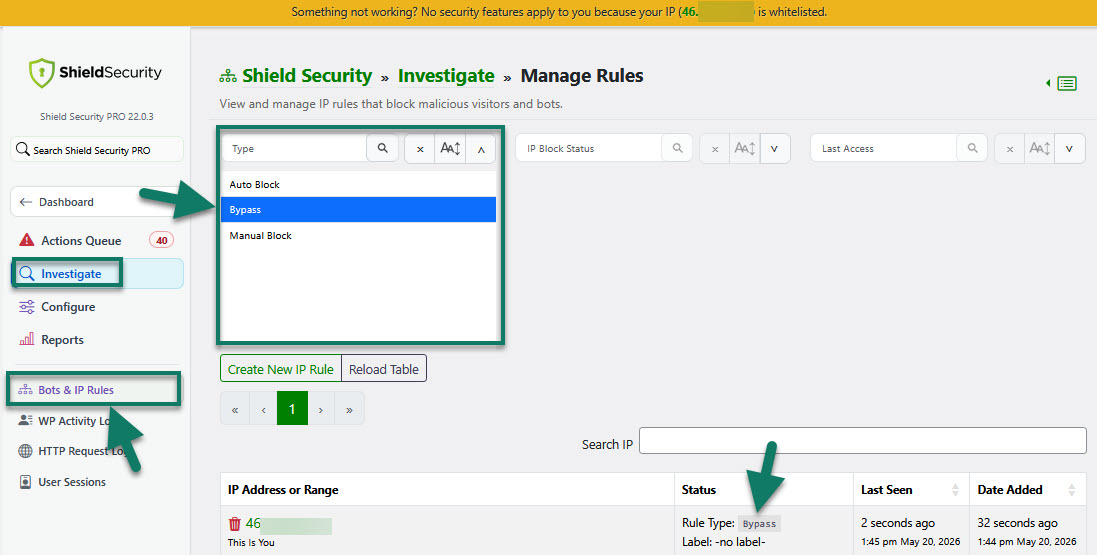
How to review/manage whitelisted IPs
When we want to review or to manage bypassed/whitelisted IPs (IPs that are never blocked by Shield) we use the same tool as for blacklisted IPs.
The data available are as follows:
- Bypassed/whitelisted IP Address
- Label
- Date/Time of the IP being whitelisted
- Delete the IP you don't want to be whitelisted, or add a new IP address you want to whitelist
If there are no whitelisted IPs, list will be empty, and you can add them manually if you want. (see below)
How to add IP to the bypass/whitelist
To add an IP address to the bypass/whitelist, you can follow the same process described above for blocked IPs using the “Create New IP Rule” button.
Go to the Bots & IP Rules table and click “Create New IP Rule” button. This will open a sidebar form where you can manually enter the IP address you want to whitelist. Complete the required fields and click “Create New IP Rule” to save. The new IP rule is applied immediately.
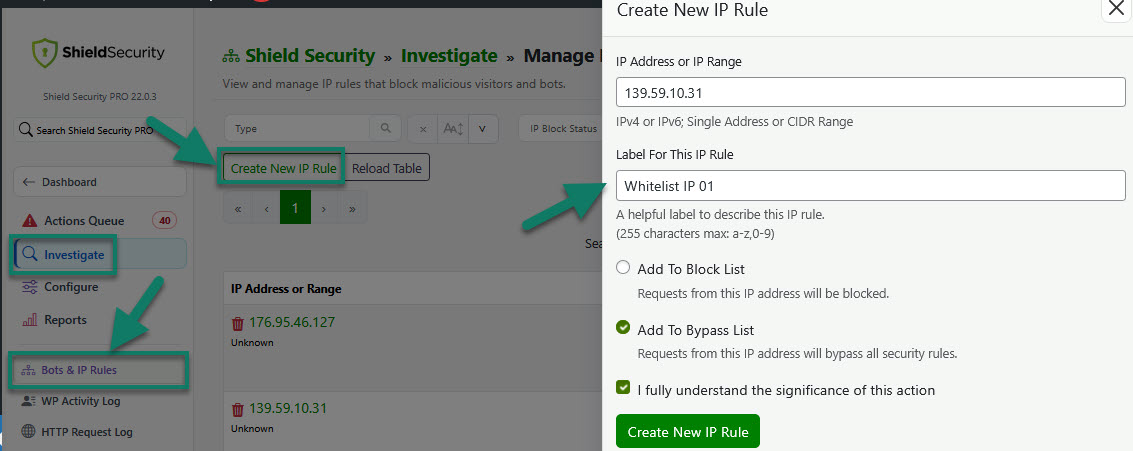
You can also access this option from the Additional Actions dropdown in the top-right corner. Select “Create New IP Rule,” then use the same form to add the IP address to the bypass/whitelist.
Note: When adding a label for a new whitelisted IP address, add anything you want - something you will easily recognize.
Alternatively, click any IP address in the table. The IP Investigate dialog will open. Click Add Bypass.
How to remove IP from the bypass/whitelist
The easiest was to do this is to filter by "Type" > select "Bypass" list. The all whitelisted IPs will be filtered out. Then click "Delete" icon for any IP you want to remove from the whitelist.
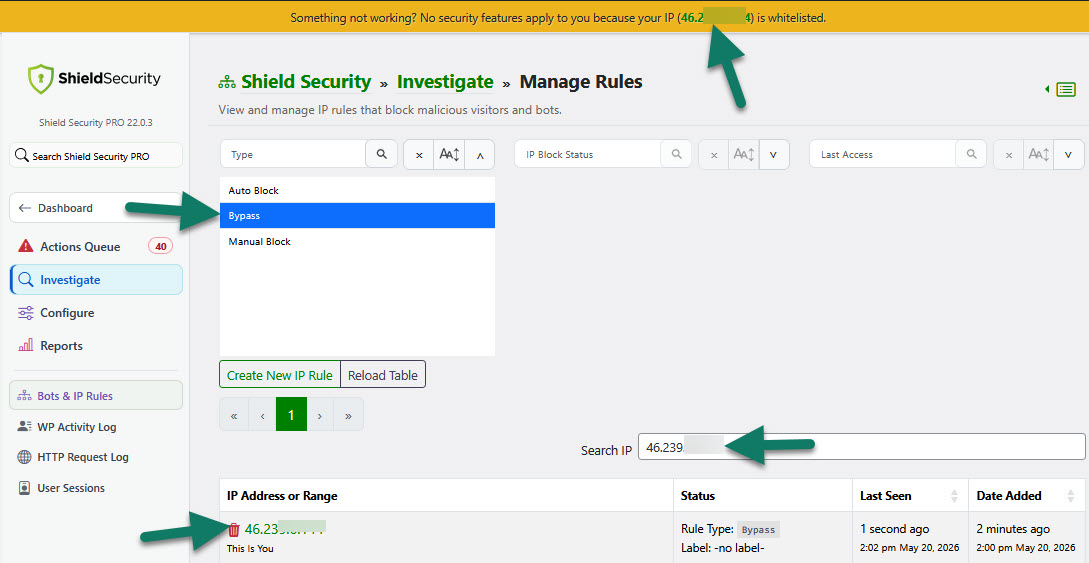
Alternatively, you can do this directly from the notice displayed at the top of the Shield admin page, or use the Search IP box to find the IP address and click to delete it.
You can also
- whitelist/blacklist an IP range ;or
- automatically import a large list of IPs to Whitelist or Blacklist ;or
- export (download) IP Lists in .csv format if you need to.
We also recommend you to read: